How to Set Up OBS Studio for Streaming and Recording


Asif Mohammad Sovon
Asif Mohammad Sovon, IT Assistant at Bangladesh Air Force and Fileion tech writer, simplifies tech t...
You open OBS Studio for the first time and see a blank canvas full of buttons. No scenes. No sources. No idea where to click first. That confusion stops most beginners before they ever hit "Start Streaming."
Setting up OBS Studio properly matters because it decides how your stream or recording actually looks and sounds. A bad setup means laggy video, muffled audio, or a stream that crashes mid-session. A good setup means smooth broadcasts, clean recordings, and one less thing to worry about while you're live.
In this guide, you'll learn how to download OBS Studio, set up your scenes and sources, configure audio and video settings, and get ready for your first stream or recording.
Let's dive into the basics before moving to the hands-on steps.
What is OBS Studio?
OBS Studio, which stands for Open Broadcaster Software, is a free, open-source application for live streaming and screen recording. It runs on Windows, macOS, and Linux.
Gamers use it to stream on Twitch, YouTube, and Kick. Educators use it to record lectures and tutorials. Businesses use it for webinars and product demos. Content creators use it to capture gameplay, webcam footage, or full-screen tutorials in one recording.
With OBS, you can combine multiple video and audio sources into one scene, switch between layouts on the fly, and send your output to a streaming platform or save it locally as a video file.
Key Features
-
Scene and source management: Build custom layouts by combining webcams, game captures, images, and browser sources into one view.
-
Multi-track audio recording: Record microphone, desktop audio, and game sound on separate tracks, so you can edit them independently later.
-
Free and open source: No subscription, no watermark, and no paywall for any core feature.
-
Cross-platform support: Works on Windows, macOS, and Linux with the same core interface.
-
Plugin support: Extend OBS with plugins for virtual cameras, chroma keying, motion graphics, and more.
Step-by-Step Guide: How to Set Up OBS Studio
-
Go to Fileion and download the installer for your operating system. Always download from a valid source to avoid bundled software.
-
Run the installer and follow the on-screen steps. On the first launch, OBS will ask if you want to run the Auto-Configuration Wizard. Choose this if you're new to the software, since it sets base video and streaming values for you.
-
Pick your usage type in the wizard. Choose "Optimize for streaming" if you plan to broadcast live, or "Optimize for recording" if you're saving videos locally.
-
Let the wizard test your internet connection and hardware. It will suggest a resolution, frame rate, and bitrate based on the test results. You can accept these or adjust them later.
-
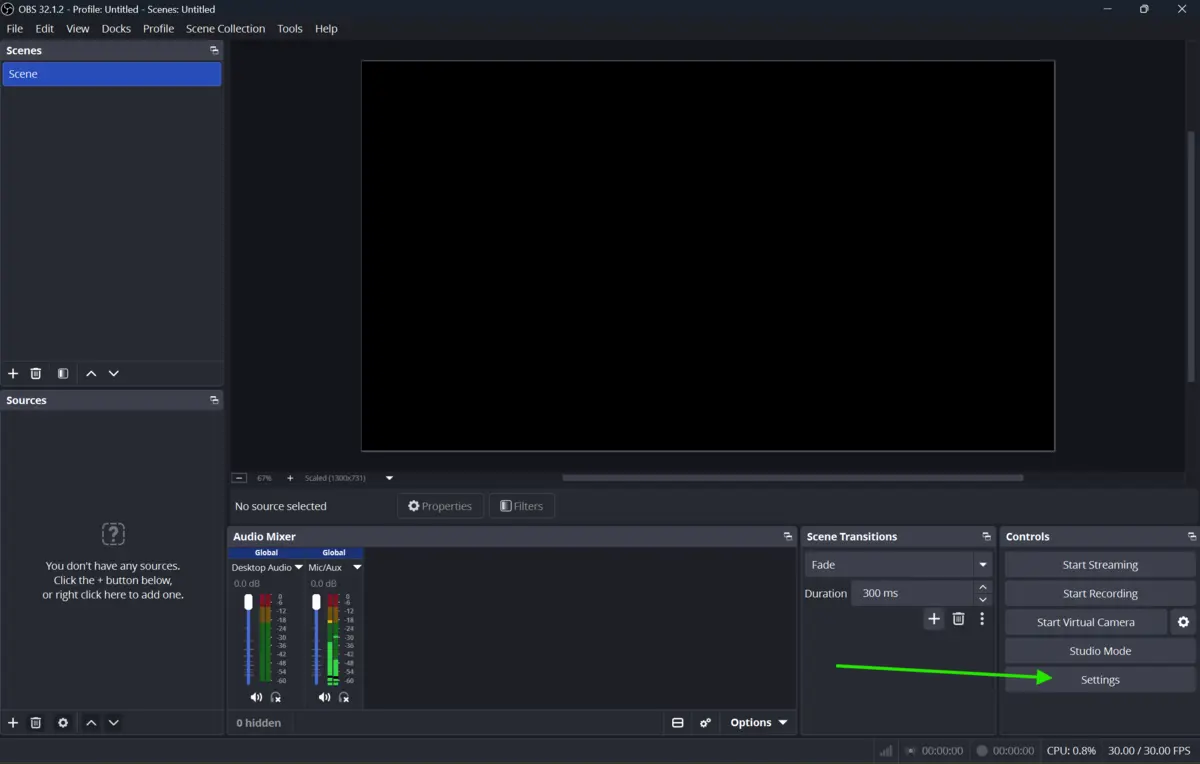
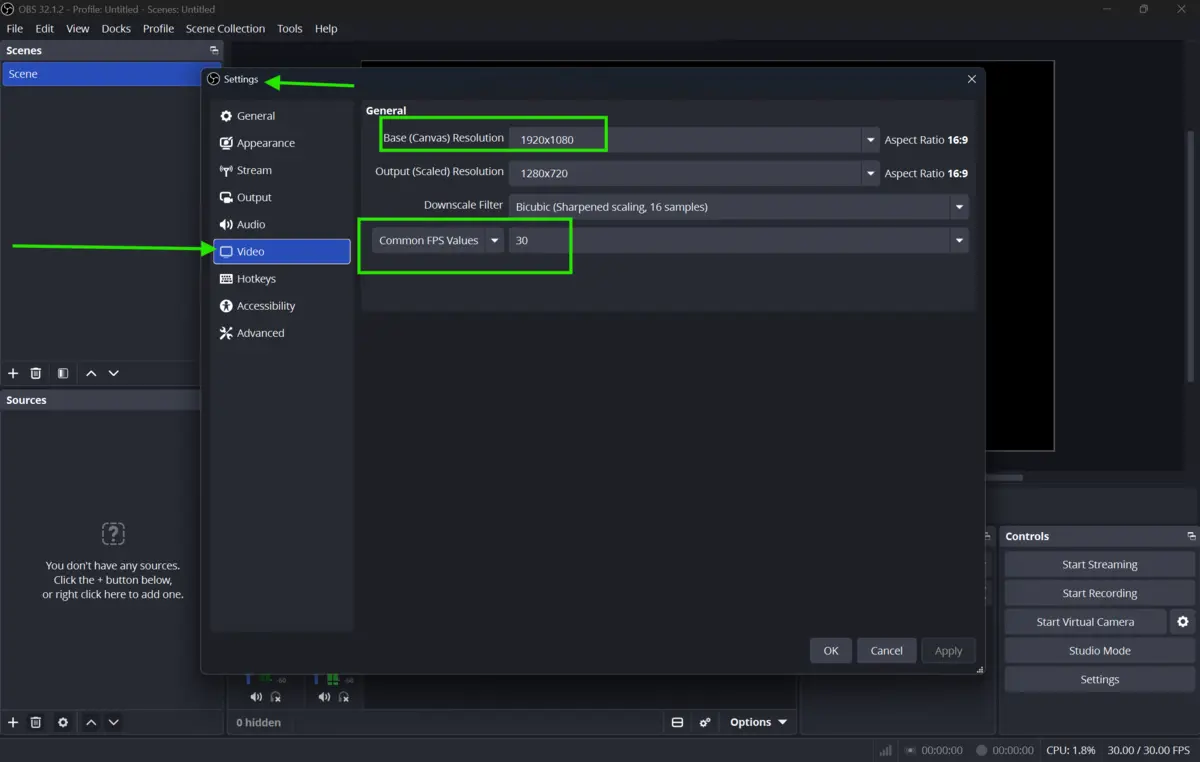
Open Settings from the bottom right corner and go to the Video tab. Set your Base or Canvas Resolution to match your monitor, and set Output Resolution to 1920x1080 for most streams. Set FPS to 30 or 60 depending on your content type. Fast-paced gameplay usually looks better at 60.
-
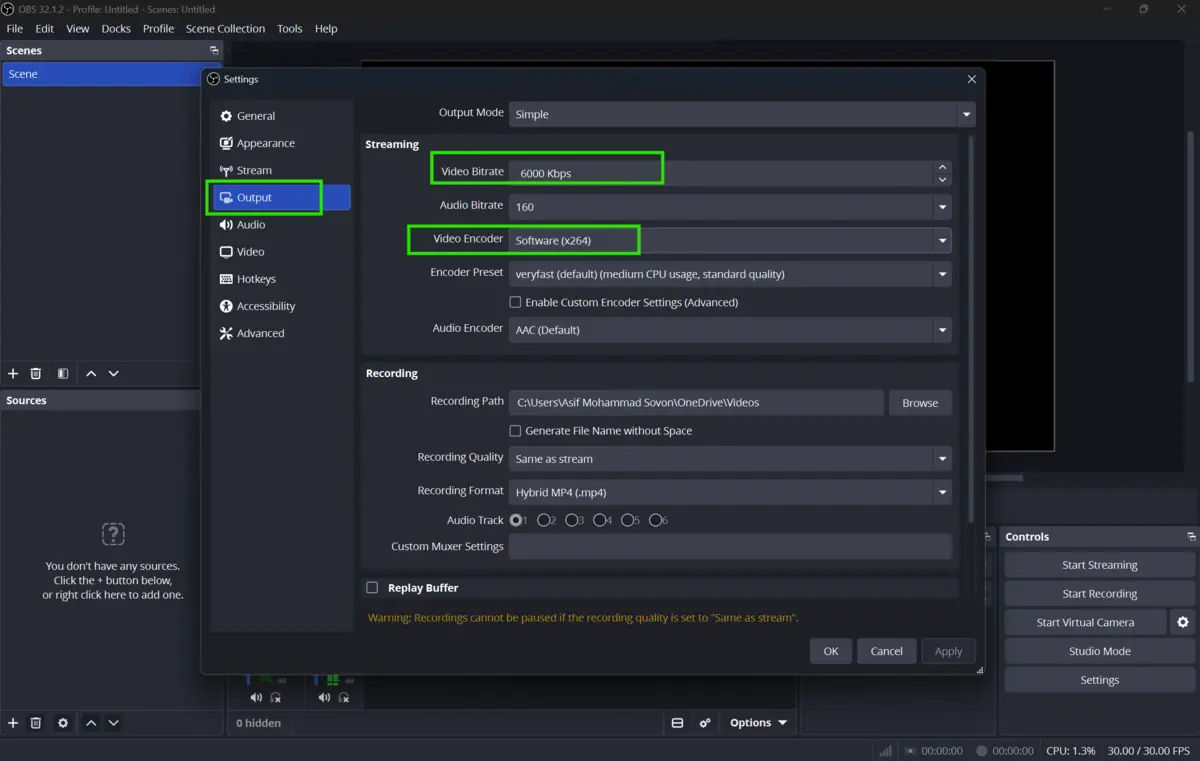
Go to the Output tab and choose your encoder. Pick NVENC if you have an NVIDIA GPU, or x264 if you want to rely on your CPU. Set your bitrate based on your upload speed. A rough starting point is 6000 Kbps for 1080p streaming.
-
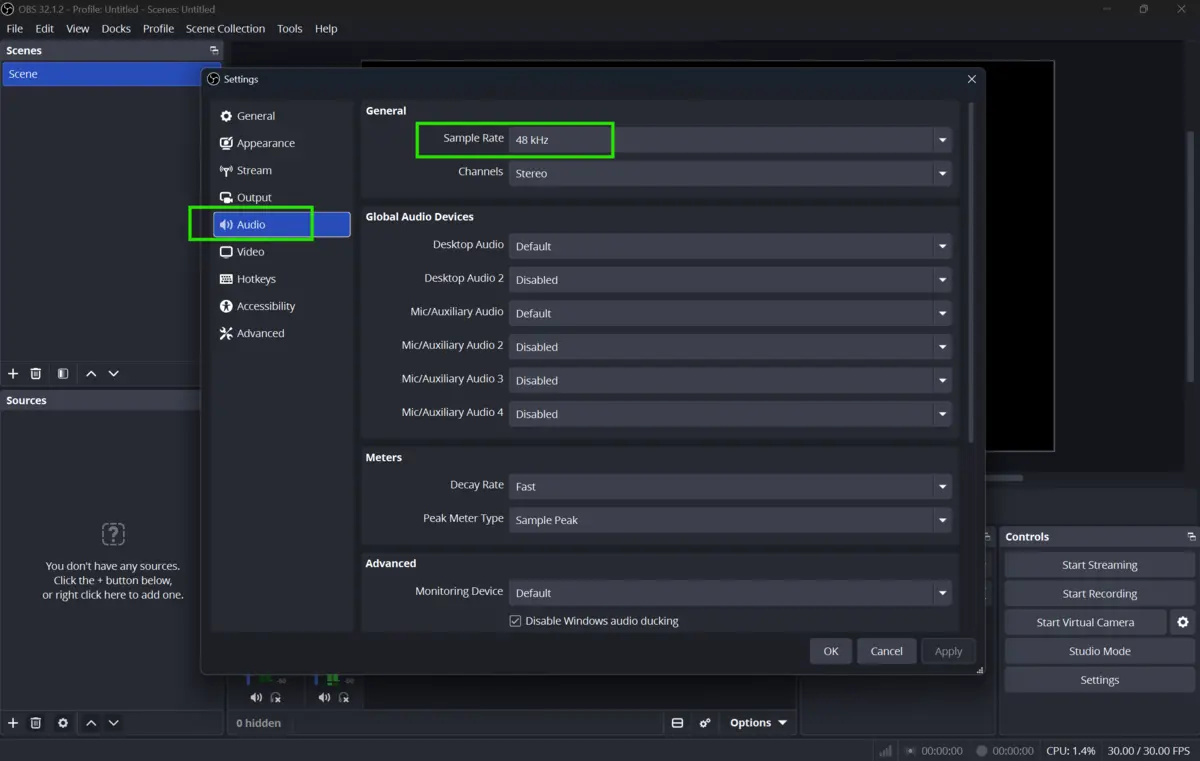
Go to the Audio tab and select your microphone and desktop audio devices. Set the sample rate to 48 kHz, which is the standard for most streaming platforms.
-
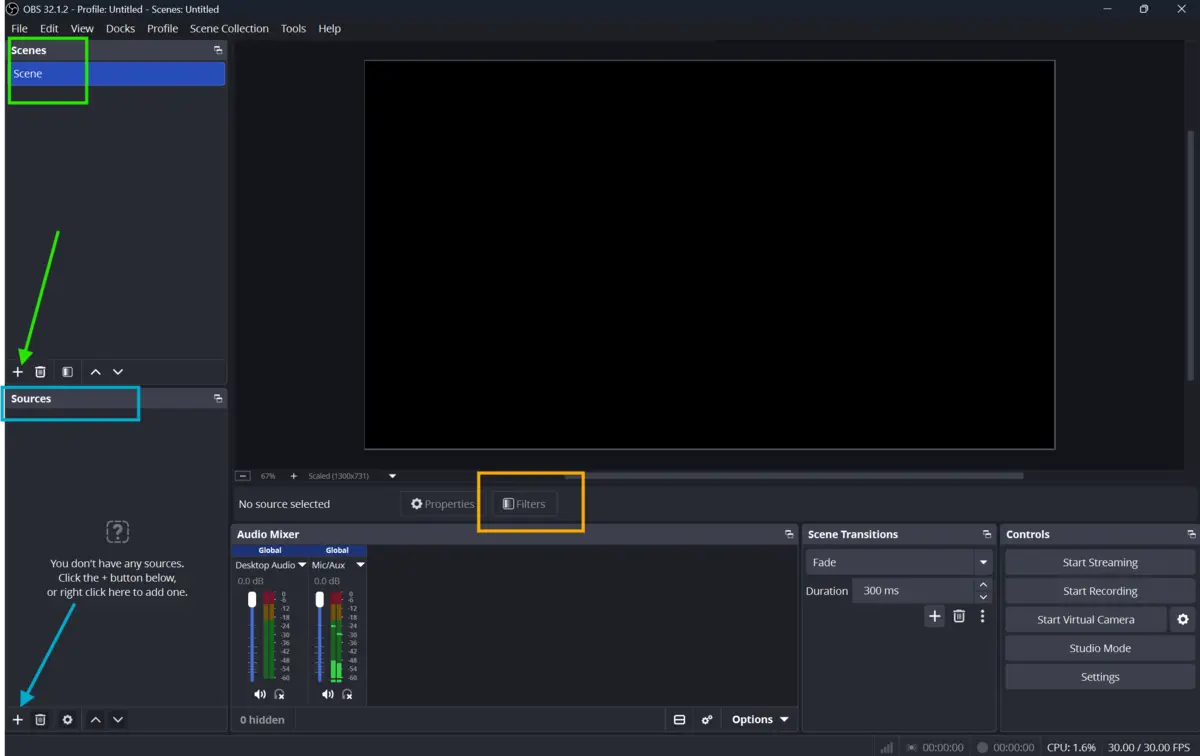
Return to the main window and create a new Scene using the "+" button in the Scenes panel. Name it something clear, like "Main Stream" or "Gameplay."
-
Add Sources to your scene by clicking the "+" under the Sources panel. Add a Display Capture or Game Capture for your screen, a Video Capture Device for your webcam, and an Audio Input Capture for your mic.
-
Resize and arrange your sources by clicking and dragging them in the preview window. Keep your webcam in a corner that doesn't block important content, like the bottom right.
-
Add filters if needed. Right-click a source, select Filters, and add options like Noise Suppression for your mic or Color Correction for your webcam.
-
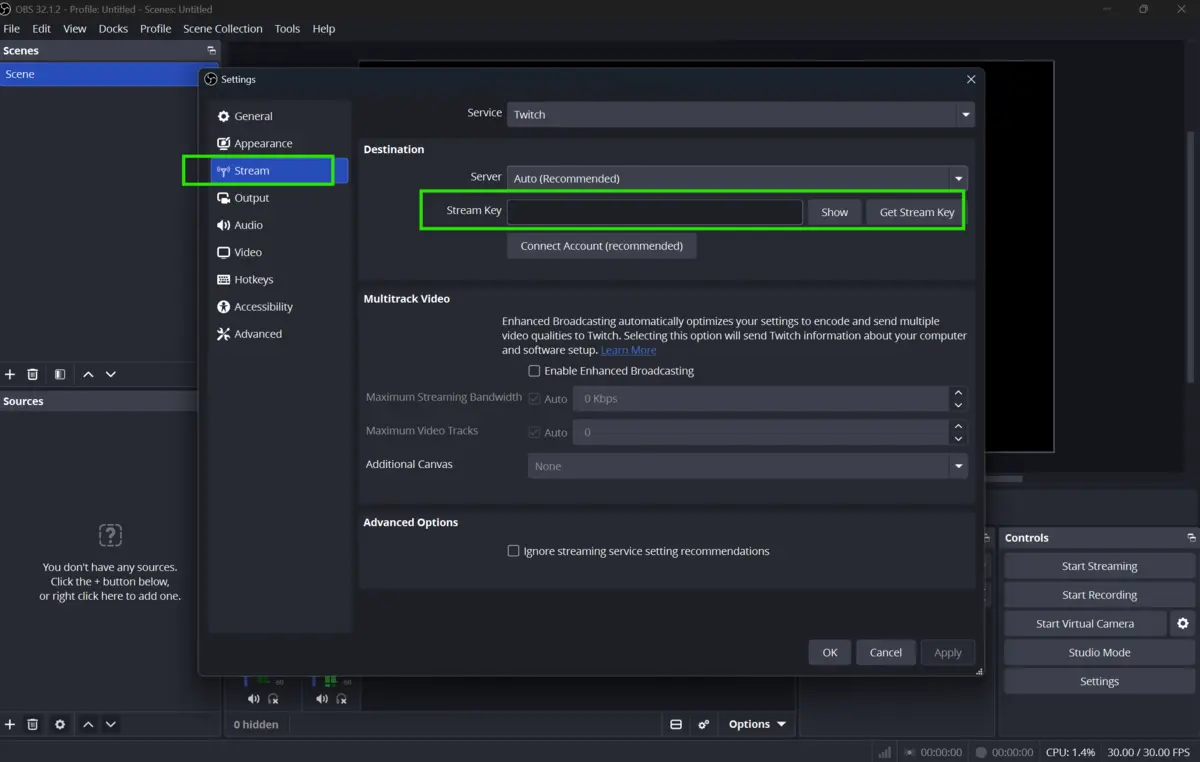
Connect your streaming account by going to Settings, then Stream. Select your platform and paste your stream key, or sign in directly if OBS supports it. For recordings only, skip this and check your recording format under Settings, then Output.
Quick Tips
-
Use Studio Mode to preview scene changes before they go live. This avoids sudden, awkward transitions on stream.
-
Set hotkeys for starting and stopping your stream or recording. This saves you from hunting for buttons mid-session.
-
Save different scene collections for different setups, like one for gaming and one for tutorials, so you don't rebuild scenes every time.
Common Mistakes to Avoid
-
Setting the bitrate too high for your upload speed causes dropped frames and buffering. Check your actual upload speed and stay under 75 percent of it.
-
Skipping the audio setup leads to silent recordings or unbalanced mic and game audio. Always do a short test recording before going live.
-
Using the wrong encoder settings can overload your CPU or GPU. If your stream lags, lower your output resolution or bitrate first.
Pricing & Availability
OBS Studio is completely free. It is open-source software with no subscription plans, no premium tiers, and no watermarks on your recordings or streams. It is available for Windows, macOS, and Linux.
Final Verdict
OBS Studio gives you full control over streaming and recording without any cost. It works for gamers, educators, and businesses who need a flexible, reliable broadcasting tool. The setup takes a bit of patience, but once your scenes and audio are configured, it runs session after session smoothly.
If you're ready to start streaming or recording, download OBS Studio from our site today and get your first scene running in minutes.
FAQs
Is OBS Studio really free to use?
Yes. OBS Studio is free and open source with no hidden costs or subscription fees.
Can OBS Studio record and stream at the same time?
Yes. You can enable both streaming and local recording in the same session from the Output settings.
Why does my OBS recording have no sound?
This usually happens when the wrong audio device is selected. Check your Audio settings and confirm your mic and desktop audio sources are active.
What is the best bitrate for streaming on OBS?
It depends on your upload speed and platform, but 6000 Kbps is a common starting point for 1080p streaming.
Does OBS Studio work on macOS and Linux?
Yes. OBS Studio supports Windows, macOS, and Linux with the same core features across all three.
Comments
Let us know about your thoughts
Explore more articles related to OBS Studio
Here you will find all the latest tips and tricks about OBS Studio. Also you will get many solution of problems which you may face while using this app.

Published at: Aug 15, 2026
Best OBS Studio Settings for Smooth Streaming and Recording
If your stream keeps buffering or your recordings look choppy, the problem is rarely your...

Published at: Aug 15, 2026
How to Fix OBS Studio Crashes, Lag & Black Screen
You hit record. OBS freezes. Or worse, it crashes mid-stream while your viewers watch a black...


Built for Serious Creators
OBS Studio is a free, open-source recording and live streaming tool built for creators who want full control. It delivers professional-quality streams, powerful audio and video tools, and zero paywalls — with a learning curve that rewards patience and long-term use.